Sunday, February 28, 2021

How do you know when to stop when you don't know how far you can go?

 Sorry for the long title but it seems apt to describe todays work on the locomotive.

As I have said before. One of the main problems working in English O scale in the USA, is the ordering of items from the UK. Small items can cost more to ship than the item itself costs. Larger items can be just plain expensive to mail over. 

To that end I've been working with what's to hand here in the States, things I can get from my local hobby shop. This loco is based on a AHM/Rivarossi Plymouth switcher. I intend to use solid blocks of wood as dumb buffers instead of buying nice sprung buffers from the UK.

So when it came to the W-irons, Axlebox and springs I had no choice but too scratch build them. Technically that's not true, I could have raided a slaters wagon kit I have, but then I would have had to scratch build them to replace those I stole in making this loco.

So with the snow coming down at a good rate of knots this morning, I knew I had a day free to attack the job. So having no idea how it would go, I blundered on using what I had around me.

Stage 1. I had a good stock of 1mm styrene strip and sheet and would use this as the basis of the items

Stage 2. I used the aforementioned W-iron assemblies from the Slaters kit as a guide for the measurements.
2mm x 1mm was a tad overscale, but as this is not an exact scale model, I was good with that.

Stage 3. The W-irons went together easily, and I quickly got to the axle boxes..
Simple is best, and a suggestion of them was enough. They were created by laminating some 2.5mm and  half round sections. I was beginning to get confident.

Stage 4. Was I too confident? I knew I had to attack the leaf springs next. Once again using styrene that I had to hand, I measured up the leaf springs on the Slaters kit and just glued the lengths of .4mm x 1.5mm strip together. My confidence was high so it didn't't seem too much of an ordeal.

Stage 5. Once one leaf spring assembly had been fixed in place, I felt as if there was no stopping me! I was reaching new levels of scratch building abilities.  

Stage 6. Four completed Axlebox assemblies that only need to be trimmed and fitted in place. They will do the job admirably I think.  

I have a sign on my refrigerator door. A phrase I live my life by. "Live begins at the end of your comfort zone". This little project was far, far beyond my comfort zone, having only just started in O scale and never scratch built any rolling stock in O before this loco. Sure, it's not perfect. It's not totally to scale, but it's a pretty good representation and it will be right for the locomotive, and you can't say fairer than that.

Sunday, February 21, 2021

Loco building in O scale part three

The weather gifted me another chance to get some work done on my DS499 model today. I have been cutting away at the chassis weigh block for days and days, trying to remove it. It was a slow job. and four sessions and four track cutting discs later it was gone. Which meant that I could move on to the next task. The construction of the bonnets.
Weight block. Gone at last!
Having spent four days trimming that weight down, there was no way that I was going spend any further time on removing any more of it to get a more accurate shape for the bonnet over the engine. The first task was was to create the radiator. This was some simple laminations of styrene and plastruct HO scale chain link fencing for the grille. Once painted, I'm sure they'll look quite passable.

After that it was a simple task to cut the bonnet to shape and size. Overall, I think it looks OK. Though a simple extra detail like some louvres on the side of the bonnet would help lift the model a tad. I might be able to fashion something for that out of quarter round styrene rod, if some can be found that is the right size.
A little fettling to get the bonnet fitting properly and all should be good.

I think the locomotive will end up with the requisite character ,
even if it's not a slavish copy of the original.

Next job then, will be to make the bonnet for the other end. Now I've done one, the other should be a piece of cake. I really do hope that once I have a crew inside the cab they will hide that other piece of weight. Because I'm most certainly not keen on cutting it off too.


Monday, February 15, 2021

My First O scale Loco building project (part 1)

 With a serious cold snap spreading across the USA. I was gifted with a day off work due to the intense cold (minus 40 Fahrenheit wind chills). So I set about making a start on the DS499 body.

It's a fairly simple box shape. The biggest problem is the big protrusion on the body weight that sits where one of the engine compartments is. It has to go. It's a long job to cut that off.

This side view shows how much of a problem that weight is

A cardboard mock up of a possible bonnet shape

The weight is also compromising the width of the bonnet.
I shan't be shaping the weight to make a better shape.

It's a simple enjoyable project to work on.


Saturday, February 13, 2021

Ennui fighting.

 Oh my. 

July. 

July 11th. That was when I last posted to this blog. Now seven months later, I'm posting again.

Ennui is a terrible thing. I started off this project with such great enthusiasm. The excitement was palpable. Things were really going to move on this project. The scheme was going to set the O scale world  alight. 

Then nothing.

The problem was I needed a locomotive to drive the project, (excuse the pun). I needed something small and quirky. Something to grab viewers attention at a show, and I couldn't find anything. Things stalled and I sought inspiration elsewhere in other projects.

Then quite by accident. Whilst searching for something else entirely. I discovered a conjectural drawing and photographs of the Southern Railway (England) Lansing Works shunter DS499. Small and most decidedly quirky. I got the feeling this was exactly what was needed for the layout.

Another consideration for any projects of mine here on the left hand side of the Atlantic Ocean. Is that they need to use materials predominantly from the USA. Shipping charges can sometimes be quite exorbitant, and often I've asked myself. "How much more than the cost of the item are you prepared to pay  to get the items here?"
That meant using one of these. The AHM Rivarossi Plymouth 4 wheel switcher to power it.

It's a very nice unit. Quiet and smooth running. There is also a six wheel version that I think was made by Roco. It is nowhere near as good as this one, much noisier and with a much bigger weight inside that takes up all the cab space.
Being a US O scale model, it's built to a smaller scale and larger loading gauge than the British prototype. The wheelbase of the unit scales out to about 8' 10", compared to the approximately eight feet of the actual loco. I was willing to live with that. Though the overall dimensions of the footplate are way in excess of my subject and needed to be trimmed down. So I set to with my trusty razor saw to bring it more into line. A very enjoyable task.

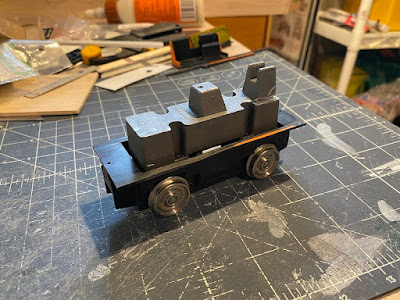
When finished, I was left with a motor bogie. I kept some of the footplate so I'd have somewhere to fix the new one to.

So far, so good then. Those two vertical lumps on the weight block really need to go. The central one sits in the space occupied by the cab, so it could be obscured by a loco crew. The other, that held the donor loco headlight has to go. 
Removing the weight is not an option as in addition to helping with current collection and adhesion, also appears to hold the axles and gears in place.
A good start then. All I will probably need to order from the UK will be Axlebox/W-irons, couplers ad buffers. Though dumb buffers could also be used for such a quirky locomotive I think.
Is this the end of the fight with ennui?
We'll see. It's a good start.


I think I’m going to build me a station (or a garden shed)

Right now, the temptation is getting a bit too much to resist. Wingham Canterbury Road calls too strongly. These stills from the Pathé newsr...